Showing posts with label tutorial. Show all posts

Wednesday, November 7, 2012

Cowgirl Demonstration Final


Wishin' on a Star, 40 x 30, oil on linen

This is how the painting is finished on the 5th day. I "oiled in" the painting, that is I brushed the painting with walnut oil/mineral spirits and then wiped most of it off leaving just a thin layer, then I did the final highlights, darks and blending. Oiling in is a fairly new technique for me but I'm liking the results.

I hope you enjoyed this demo. Would you like to see more?

SOLD at Lovetts Gallery, Tulsa

See Day 4 of Demo

Tuesday, November 6, 2012

Cowgirl Demonstration Day 4


Day 4 Demo,

Ok. The face is starting to look the way I want it to. The shirt is taking shape.

More layering and blending. Are you starting to get the idea? No big changes, just layering and blending. Darken the darks, lighten the lights, and get a smooth transition

See Day 5 demo

Thursday, October 25, 2012

Cowgirl Demonstration day 3


Day 3 Demo

Layer and Blend, Layer and blend

I'm still concentrating on the face but slowly expanding to the rest of the painting. I've worked on the hat, hair and shirt.

See Day 4 Demo

Saturday, October 20, 2012

Cowgirl Demonstration day 2


Day 2 demo

I'm just going to show the work I've done on the face because it's easier for you to see and because that's what I concentrate on most.After all, if the face isn't 'right' there's no point in going on with the the painting.

I paint in thin layers, building up the lights and darks. I'm also trying to get each shape correct at this point.

 I'm also blending the edges as I go along so there are no harsh changes between the shadow and light. That was one of the challenges of this painting because she has a definite shadow from her hat falling on the light side of her face plus some reflected lights in the shadow area.

I let this dry and do another layer on Day 3

See Day 3 Demo

Wednesday, October 17, 2012

Cowgirl Demonstration Day one


Day one Demo

This is how the painting looks at the end of the first day. Not much to look at.

I start by doing my drawing on tracing paper the same size as the canvas. When I'm happy with the drawing I transfer the major details to the canvas with carbon paper or transfer paper. I spray the canvas with a  fixative.

I then block in the masses of color and let the painting dry. Since I paint in thin layers, this usually dries overnight.

See Day 2 of Demo

See Preview

Wednesday, October 10, 2012

Silver Screen Cowgirl Demonstration

I've had several folks ask about my technique in painting my sepia Silver Screen Cowgirls so I promised to post a demo.

First, let me apologize for the photos. They aren't great. I photographed the painting at the end of each day. I paint under Daylight florescent bulbs which makes the image a bit yellow. Some of the images were taken with natural light. Anyway, I think you'll still get the idea.

This is my palette. The top left is Permalba white, the bottom right is Winton Raw Umber. I've mixed the two together to get seven more values. There's nothing exact about this, I just want a range of values.

Next: day one - blocking in the values

See Day One of Demo

Friday, October 1, 2010

Cowboy's Sweetheart - Work in progress


Cowboy's Sweetheart, Work in progress
I had a few folks asked me to post images of my work in progress so here it it.

FirstI draw the image on tracing paper the size of the canvas. Then, with carbon paper, I transfer the image to the canvas.

I start my paintings in different ways, depending on the subject and the colors. In this case I'm starting with a monochromatic (raw umber and white)underpainting. This is the results of 1 day's work

Friday, October 2, 2009

Top Hat - American Indian oil painting final stage


This is it. I added color to the face, also adding some darks and lights and finished the details on the painting.
I'll keep the painting around for a bit to make sure that it is truly finished before sending it off to a gallery

SOLD

Thursday, October 1, 2009

Demo - Top Hat Oil painting

I've done Demos on my Other Blog and I was asked to do one of an American Indian painting.

First I do a drawing on tracing paper that is the same size as the canvas. Then with carbon paper I transfer the image to my canvas

Step 1. In this step I refined my drawing and block in the background color and the red and the blue.

Step 2. After the first layer has dried, I did an underpainting with raw umber to define the lights and darks. I also added some lights to the background
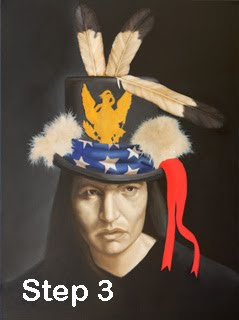
Step 3. Still using the raw umber and white, I put more detail in the face, and feathers. I started painting the hat, the emblem and the starred fabric.

Next: I'll add color to the face and continue adding details